Tuesday, October 26, 2010

One project down...twenty more to go!


I finally finished this lap size quilt for my sister.  It is a project I started almost 2 years ago when I was first learning to quilt.  There were a lot of tears and visits to my friend Dreena (a very experienced quilter) to get this top put together.  I don't know about you, but I have a hard time visualizing the construction part of putting together any garment or quilt or even notions like snaps for heaven's sake!  So, this is actually Quilt #2--the first one I threw away before I knew about pinning and easing the fabric to make the rows line up.  I remember sewing the rows together and lamenting to my husband after each one that my rows looked liked stairs--each one about an inch longer than the other.  It was true, and he had no idea what to say to help me out (kind of like the first time I tried to insert a bobbin in my machine--we will laugh about that forever)! 

Needless to say, once I got the basics of patchwork, I literally put this quilt on a shelf and never looked back.  But, I need to clear out some room and her birthday was last week, so it was time to get it done.  The pattern is from Eleanor Burns' Quilting Through the Seasons and if I'm not mistaken the design is called "Front Porch."  The second time I made the quilt I opted for the stained glass version instead of the scrappy look and I think it turned out quite nice in black, white, and gray.


Two things I learned from my first quilt:
1.  Don't throw a quilt away if it's not going together correctly--ask someone with more experience for help because it [probably] can be salvaged!
2.  Never use Warm and Natural batting beneath white muslin.  It makes the white take on a dingy hue.  I always just buy Warm and White now to avoid that problem.

Monday, October 25, 2010

Eye Candy


Look what came in the mail for me from Glenna at Hollyhock Quilts (here)...a set of 14 half yards of 30's solids all wrapped up with a pretty bow.  I can't wait to get started using these with the Immense Collection of 30's prints I have amassed over the past two years. 


Now that I'm done making a Robin Hood costume for my oldest, I am finishing up a [late] birthday gift for my sister who lives in cold country and needs as many quilts as possible to stay warm August through May.  Then I will get started using these solids to make a teacup tablerunner I've been planning in my mind for months.

Tuesday, October 19, 2010

Unfinished Projects


My husband is super-impressed that I've been cleaning up all my crafting stuff around the house and finishing a million projects I started this summer.  Must be that nesting instinct!  So I finally finished this toddler size quilt for a friend to gift to a friend.  It's for a family who loves giraffes, so they should get their fill with this quilt:)  I love how poofy the quilt is.  I've never quilted with polyester batting before and I have to say it was relatively easy.  Except for the bulk, even with a toddler size quilt.  All in all, though, I think it turned out nicely.  And since I have two super gigantic rolls of this batting courtesy of a friend who is a professional long-arm quilter and decided she hated it and passed it along to me, I'll be using it!


Now I am moving on to a denim rag quilt I made for my mother for Mother's Day (yes...month's ago) that I never got around to trimming up after washing.  I will be spending a few hours in front of the tube tonight getting it ready to finally give to her tomorrow when she visits to take Bea to see Secretariat.

Sunday, October 17, 2010

Halloween Table Topper Part II


Last night I finished binding the two table toppers and I think they turned out pretty splendid (at least my 4 year old thinks so). I let her choose which one to keep and which one to give away, so we are keeping the one with the "spider web" design on the back. It looks nice in our living room:
The binding is completely machine attached. I have been honing my machine binding skills lately and I think I'm getting pretty good at it. It just takes a little patience and a lot of pinning. I entered a couple quilts in the county fair recently (third was my highest placing), and on one table runner the judge wrote "interesting binding" as a comment on the back of my card. Not sure what he/she meant by that. Interesting=good or Interesting=do it by hand next time. I gotta tell you, though, I don't think I will ever hand sew binding on anything ever, ever, ever again in my life. I just don't have it in me. The only think I'll ever hand sew will be hems that need to be repaired, and if I ever learn how to use my serger, I might never have to hand sew in my life again!
Stay tuned as I share some easy Halloween crafts you can do with your kids. Not all of them involve sewing, but they are guaranteed to be fun! Also, coming up will be a countdown to Christmas with great homemade gift ideas for kids that you can make either with or for a child.

Wednesday, October 13, 2010

Halloween Table Topper

We are going to my sister-in-law's sister's house for a Halloween party. This is an impressive party--lots of kids and tons of creative food and decorations. Since I am huge already (8 months pregnant), I volunteered to bring apple cider with mulling spices (not a lot of cooking involved), I thought I'd make something for Debbie's dining room table. Her table is average size and round, so a table topper would be a much better choice than a table runner. I get up about 2 hours before my family every morning so I have some time to myself and to work on my crafts. I whipped up these two table toppers (I haven't binded them yet) between my morning (deciding on a design and cutting) and my husband taking the kids to the local pond and giving them their bath tonight (making the blocks and quilting):

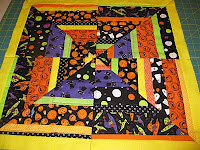
They didn't take long to make at all and you can just use scraps if you're like me and have quite a few oranges, yellows, and greens in your basket. All of the Halloween prints are leftovers from Halloween trick-or-treat bags I made for my daughters and their friends.

Finished size: 19"x19"
Supplies:

  • the equivalent of 8 jelly roll strips of various Halloweeny fabric (I used all kinds of scraps and cut them all 11 inches long with different widths from about 1 1/4 to 2 1/2 to accomodate some of the bigger Halloween prints) You can double the amount to 16 jelly roll strips to make two table toppers.
  • 2/3 yard for backing Or you could make a scrappy backing.
  • 1/4 yard for binding

Steps:

1. Make 4 (or 8) blocks from your strips that measure about 11 x 11". Press all the seams in one direction.

2. Cut the blocks down to 9 1/2 x 9 1/2 inches square.


3. Cut the blocks from corner to corner on the diagonal to make two triangles.


4. Decide on a design layout with your triangles--I'm not so proficient here, but I think you could make pinwheels or diamonds or whatever shape. I arranged mine to look kind of spider-webby.

5. Join two blocks together and then the remaining two blocks together. Press the seam allowances so that they lie in opposite directions when joining the two halves.

6. Sew the two halves of the table topper together. The center will be thick from all the seam allowances. In order to get my sewing machine through the thickness, I trim out as much seam allowance as I can. Then, when I start sewing, instead of starting at one end of the seam and sewing to the end, I start directly in the middle where the points all meet so I can make sure that the perpendicular seam lines up perfectly. Then I sew from the middle to the other end.

7. Then I sewed on a 1 1/2 inch yellow border. I chose a fabric that wasn't part of the blocks to try to really make the center pop out. You can't really tell from the photo, but the yellow isn't solid--it has some white pindots. My husband said the topper is "trippy."

At this point, once all the borders are on and trimmed/squared, in order to make everything super flat and ready to quilt, I turn on the steam on my iron and press to my heart's content.

8. Layer the batting and backing and quilt as desired. I did two different quilting designs. The first table topper I quilted with straight lines, using painter's tape as a guide. The second table topper I quilted in the ditch when each triangle is joined to the next. Then, I quilted concentric squares which gives the back a kind of spider web design. The second design is my fave. I used painter's tape to make this design, too. I really like painter's tape...if you ever accidentally quilt through it, the perforations from the needle make it a snap to rip off anyway. A great way to sew a straight line or design.

And once you bind it, voila! you're finished and have something great to brighten up a table for Halloween. This is my first tutorial, so feel free to email me any questions.


Tuesday, October 12, 2010

Glenna at Hollyhock Quilts

I want to say a big THANK YOU to Glenna at Hollyhock Quilts (http://hollyhockquiltsblog.blogspot.com/). I found out yesterday that I was the final winner in her weeklong giveaway that culminated in a collection of Moda charm packs and a layer cake. My husband ran into the kitchen after I found out I won...see, I'm 8 months pregnant and he thought it was the big moment! Winning fabric is almost exciting as going into labor:)

Here is a rundown of the prizes:

A Kansas Winter layer cake by Kansas Trouble Girls and...four Moda Sandy Gervais charm packs!!!!!!!!!!


The awesome thing is that I have a couple yards and a panel that are part of the Fall Back in Time collection so stay tuned to see what I make from that!

Thanks again, Glenna, and check out her shops on Ebay and Etsy for great reproduction fabrics. She is my favorite fabric designer (even though she is taking a break from that right now) and designs great feedsack reproductions that I love...especially the bee fabrics!